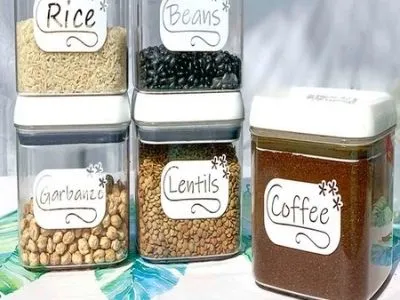
Vinyl labels are a popular item that people use to customize gifts and home decor and organize household items like spices, clothing bins, homemade cleaners, and flour mixes.
There are several ways to make these labels with the Cricut machine. Let’s see how to make vinyl labels with Cricut.
How To Make Vinyl Labels With Cricut
Most labels are created using Cricut adhesive vinyl sheets.
Choose a template in Design Space, and customize the labels to suit your purposes.
Load the vinyl sheet into your Cricut machine and let it cut them out.
The finished vinyl labels can be peeled off the backing and applied to nearly any hard surface that is properly prepared.
Read our related article on How to Make Wine Labels With Cricut. Whether you make your own wine or you want to create customized wine for your event, this guide is for you!
What Materials Can I Use To Make Labels on Cricut?
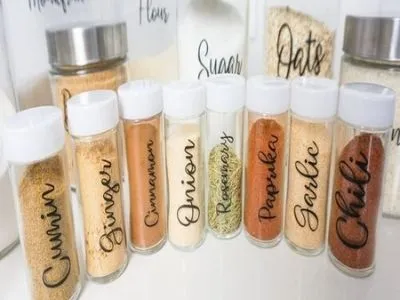
Making vinyl labels on a Cricut machine is a simple and effective way to promote your business or brand, organize household chores or projects, or share information.
The most common and simple materials to use for making labels with a Cricut machine are vinyl sheets and vinyl rolls.
Vinyl sheets are the easiest for making labels because they’re easier to program and simpler to load. They’re also best if you want a variety of colored labels.
Roll vinyl is best and necessary for labels that are large because you can cut a single label rather than piecing one together from multiple vinyl sheets.
Roll vinyl is also convenient for creating many labels because you don’t have to load sheet after sheet of vinyl.
Read our related article, How to Tell if Cricut Vinyl is Permanent or Removable for more information on Cricut Vinyl types!
Creating Your Vinyl Labels
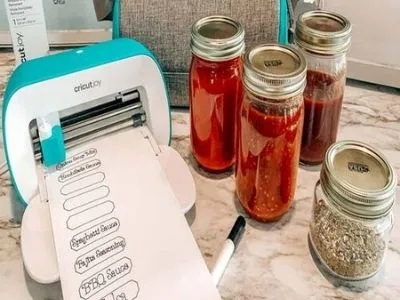
Once you’ve chosen the type of vinyl label you need, it’s time to start creating your labels. Use Design Space templates to customize your labels.
Feed your vinyl sheet or roll into the Cricut machine and let it do the cutting for you.
Not sure where to start with templates? Check out our guide on How to Use Templates in Design Space.
Applying Your Vinyl Labels
If you’re using vinyl sheets, you can simply peel off the backing and stick the label in place. If you’re using vinyl rolls, you’ll need to use transfer tape to apply the labels.
Removing Your Vinyl Labels
If you ever need to remove your vinyl labels, it’s easy to do. If you’re using vinyl sheets, you can simply peel off the label.
If you’re using vinyl rolls, you can use a heat gun or hairdryer to slowly heat up the label and release the adhesive.
Read More: How to Make Custom Hand Sanitizer Labels. Fun for classrooms, offices and home, we show you how to make Cricut hand sanitizer labels!
How to make vinyl labels with Cricut – Other Options
Use a slick, shiny vinyl for your label design, and use the Cricut machine to cut blank labels. You can apply these to containers and mark on them with wet-erase markers.
When you need to change the label, simply wash away the writing and label it anew.
One option for creating vinyl labels is to design them on the computer and then upload those files into your software for cutting.
You can also make custom designs using either Adobe Illustrator or Inkscape, depending on which one you prefer, and then use the Cricut Design Space software to cut out your designs onto vinyl.
This method gives you maximum control over how your label will look as well as allows you to create text and graphics using vector images.
Another option is to use a design software program that comes with your Cricut machine, such as Cricut Craft Room.
With this software, you can upload image files from your computer and create text on the same page as well.
This gives you even more versatility in designing your own vinyl labels.
Read our related article, Why is My Cricut Not Cutting Through Vinyl? Troubleshoot problems with our quick user’s guide!
Use Cricut Design Space to Create Labels

The most popular way to create Cricut vinyl labels is to create an image within Design Space by using the drawing tools there.
The program also has templates you can use to quickly customize your labels.
You can also upload shapes into Design Space, or draw them yourself, and attach those images to each other to form a label.
Once you have made your own unique designs for your vinyl label stickers, it will be quick and easy to make them when you need them with your Cricut machine.
Read More: How to Slice Letters in Cricut Design Space. Slicing text isn’t as difficult as you may think! Here’s what you need to know to get started.
Wrapping Up
No matter how you choose to design your labels, the Cricut can help you make professional-looking vinyl labels that will look great on any product or surface.
We love to use the Cricut for vinyl labels because it’s so quick and easy and makes our products look better than ever.