If you’re looking to add a touch of elegance to your paper crafts, embossing with your Cricut Explore Air 2 is a great way to do it!
With the Cricut Explore Air 2, it’s easier than ever.
Here’s everything you need to know about how to emboss with Cricut Explore Air 2.
Materials Needed to Emboss

When it comes to learning how to emboss with Cricut Explore Air 2 it’s essential to know the correct materials to do this.
Regardless of the level of skill you possess, using the wrong materials might not give you the expected results.
This can result in a waste of time of your time and effort.
Here are the required materials to emboss with your Cricut Explore Air 2:
- Cricut Explore Air 2
- Embossing tool
- Embossing mat
- Cardstock
- Design Space software
- Heat gun
With these supplies on hand, you’re ready to start embossing.
All that’s required is to combine these materials together to deliver the best results.
Guide to Embossing With Cricut Explore Air 2
When figuring out how to emboss with Cricut Explore Air 2, there are 2 main ways you can go about it:
- Heat embossing
- Dry embossing
Heat embossing involves using a heat tool to melt the embossing powder, which then hardens and creates a raised design on the paper.
Dry embossing uses a specially-designed stylus to press the paper and create a raised design.
Each method has its advantages and disadvantages, so it’s important to choose the right one for your project.
Heat Embossing
Heat embossing is ideal for projects that require intricate designs or detailed images.
The heat tool can melt the powder very quickly, so you can achieve precise results.
However, heat embossing can be tricky to master, and it’s important to be careful not to overheat the powder or the paper.
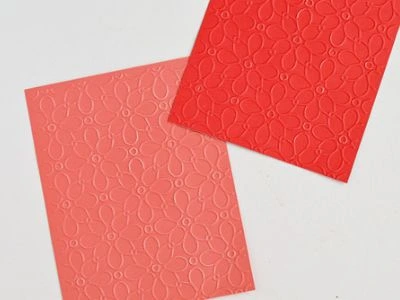
Dry Embossing
Dry embossing is a great option for beginners, as it’s very easy to get consistent results.
It’s also a good choice for projects that require large, bold designs.
However, dry embossing can be time-consuming, and it’s not always possible to achieve the same level of detail as with heat embossing.
How to Heat Emboss with Cricut Explore Air 2

Embossing is a great way to amp up your craft projects and the Cricut Explore Air 2 can do it.
Heat embossing is the easiest and most popular way to emboss with your machine.
Let’s look at how to do this:
- Put your machine in “write” mode and not “cut” mode
- Insert an embossing pen into your machine
- Print the design that you’ve chosen
- Once it’s done, just remove the material from the machine and sprinkle on your embossing powder.
- Using a heat gun, melt the powder into the material. Be sure not to overheat.
That’s it!
it’s actually quite easy and you can emboss a number of different materials while pairing it with different embossing powders.
Here’s a great video explaining heat embossing by making Christmas Ornaments:
What Materials Can Cricut Explore Air 2 Emboss?
There are many different materials that can be embossed using this Cricut machine. Let’s look at some of the top ones:
- Soft metals
- Paper and cardstock
- Leather
- Acrylic
- Plastic
Tips for Embossing
To end this off on a helpful note, we’re going to give you some tips for embossing with your Cricut Explore Air 2.
Settings
Ensure that your settings are correct throughout the process to ensure that your project comes out right.
Some settings to consider are:
- Machine is on “write” when embossing, not “cut”
- Settings for the material that you’re using
- Ensure that the canvas size is correct
Our related article on How to Set Canvas Size in Cricut Design Space would be helpful here!
Embossing Pen
The embossing pen is going to be a huge factor in how well your machine embossed the material.
Make sure to get a good quality Cricut embossing tool that’s used for the particular material that you’re embossing.
Heat Gun
Your heat gun should be of good quality and it should work properly for what you need it for.
Be sure NOT to overheat your embossing powder and to heat it in small increments at a time to avoid this.
Final Thoughts
There you have it; we’ve gone over all the tips we have for embossing with your Cricut Explore Air 2.
You should be ready to start your next embossing project right now!