Do you love nail art, but don’t have the time or patience to do it yourself? Well, Cricut has the perfect solution for you!
We will provide you with a step-by-step guide on how to create your own decals, as well as some tips and tricks for making them look their best.
So get ready to take your nail art game up a notch with Cricut!
How To Make Nail Decals With Cricut
To make nail decals with Cricut, measure your nails to find the size of graphics that will fit your nails in millimeters.
Search the Cricut Image Library or import the graphics you want, then resize them to fit your nails.
Load a thin adhesive vinyl sheet into the Cricut and let it cut your decals. Use tweezers to remove them and apply them to your prepared nails.
Cover with a coat of clear nail top coat polish.
Read More: How to Make Waterslide Decals With Cricut! If you’re new to waterslide paper, this guide is for you! We cover what you need to know.
How To Make Nail Decals With Cricut Step by Step
The first thing you will need to do is gather your supplies. For this project, you will need:
- A Cricut cutting machine
- Nail polish in the color of your choice
- A clear topcoat nail polish
- Cricut vinyl (a thin sheet)
- Nail decal adhesive (if not using adhesive vinyl)
- A ruler
Now that you have all of your supplies, it’s time to get started!
Step 1: Measure the length of your nails
To measure your nails, you will need a ruler. Start by placing the ruler at the base of your nail.
Measure your nail length and width in millimeters so you know your maximum decal size.
Measure all your fingernails and write them down to make accurate-sized decals with the Cricut.
When measuring leave out a bit on the sides so that the vinyl sticker does not touch the side skin of your nail.
If you’re using very small accent decals, simply measure to ensure it will fit properly on your nail where you want to place it.
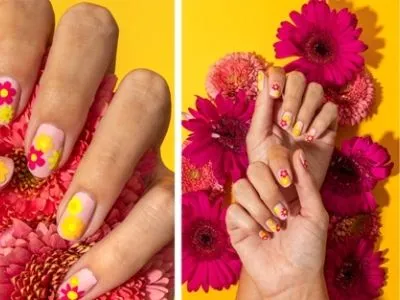
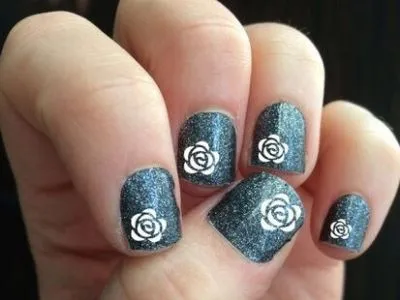
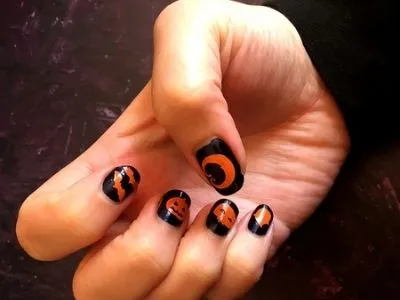
Step 2: Design your nail decals
Selecting images for your nail decals is an important step in the design process. If you’re using Cricut Design Space, you can select pre-made designs or create your own.
Once you have your images, it’s time to use the measurements of your nails. This will help you determine the size of the decals you need to create.
Resize images that are too large so they’ll fit your nail.
Simple images work best because most complicated images don’t look right when resized to fit on a nail.
If you believe a particular portion of your image will be too tiny in the cutout, use the Contour tool to remove it to achieve a more basic design.
You may either duplicate the designs for your other hand or use completely different pictures.
If you wish, you may utilize the “Flip” button to make a reflection image of all the designs for your other hand.
Read More: How to Use Contour in Cricut Design Space. Learn the ins and outs of the Contour tool here!
Step 3: Apply a Nail Polish Base Coat
Ideally, you should apply the nail polish a couple of hours before using the decals, so that it has time to fully dry.
You may want to paint your nails before sitting down to design and cut your decals.
If you don’t let your nail polish dry, the decal will “float” on the tacky nail polish, not allowing it to dry which will result in your decals moving around.
You’ll also nick the soft nail polish while applying the decals.
Step 4: Remove the Excess Vinyl From the Decals
Removing excess vinyl from stickers can be a tricky process. If you’re not careful, you can damage the sticker or leave behind unwanted adhesive.
The best way to remove excess vinyl is to use a weeding tool.
These tools are designed to safely remove small pieces of vinyl without damaging the underlying material.
To use a weeding tool, simply insert the tip under the edge of the vinyl and carefully carve away the excess.
Once you’ve removed the excess vinyl, you can then proceed to apply the sticker to your nails.
Step 5: Place the decals on your nails

To place your decals properly and ensure that they stay in place, it is important to follow a few key steps.
If you’re using adhesive vinyl, then you can simply peel the decals up and place them on the nail.
If the vinyl is not adhesive, use a tiny dab of nail glue or vinyl adhesive to keep the decals in place.
First, carefully pick up your decal with a pair of tweezers and hold it over the nail with one hand.
Carefully move it into place and then use your finger to gently smooth it down to the contour of the nail.
Step 6: Apply clear nail polish Top Coat to seal
Applying one or two coats of clear nail polish to your nail can help seal the nail art and make it last longer.
It will also help your vinyl decals look more like custom nail art.
It is important to use a good quality clear top coat polish as some cheaper brands may not provide the same level of protection, or they may not dry fast enough to keep from marring the surface of the nail.
In general, nail art that has been sealed with a quality clear top coat will stay around 3-4 days before beginning to show wear.
Of course, this will vary depending on the type of design and how active you are with your hands.
However, if you want your nail art to last as long as possible, sealing it with a clear top coat is a great way to go.
Wrapping Up
Nail art is one of the most fun projects we do with our Cricut machine because we can create custom nails so quickly and easily.
We also like to use adhesive foil sheets and other interesting Cricut materials to make our nail art stand out.