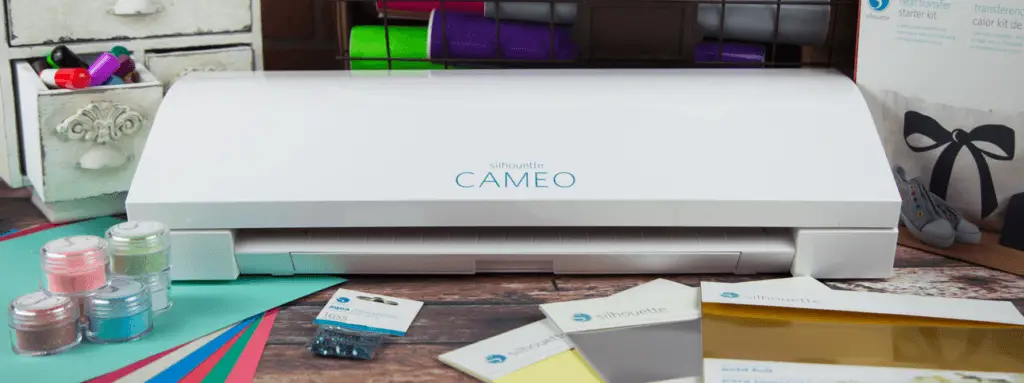
Step by Step Guide on How to Use Silhouette Cameo

We all been there we’ve bought something and made so many great plans for it. Then the reality check sunk in. How do you get started with this machine?
This is why I’ve created this How to Use Silhouette Cameo guide. There’s a steep learning curve no matter which machine you buy. So I’ve decided to create an easy tutorial to get you over that initial hump.
The Gaming Industry’s Secret Weapon
I had to steal a few ideas from the gaming industry. Did you know that every game nowadays has some kind of tutorial?
Have you thought about why? The answer is simple because people at the first sign of struggle will quit and probably ask for a refund. This is why they have created tutorial scenarios to get users those early first wins.
All you need is one or two early wins, and you will be able to tackle any challenge. You see once you get used to winning and you want to keep on winning.
Silhouette Cameo 4 is the right product for cutting vinyl. For crafters to adopt it and use it regularly, they need to feel comfortable. Once they have their initial successes, they will dive deeper and they with their machine.
To be fair, the machine has some tutorials. Sadly it’s not enough to get you started.
Now, I’ve structured this How to Use Silhouette Cameo guide: first, I will talk about the machine then I will give you some helpful tips and tricks to use the Silhouette Design Studio. Besides this, I will cover what you need to know to get you started with the mat. How should you set up the machine, so your cutting experience is as smooth as possible? And last but not least getting the job done and doing the weeding process.
Hold onto your hats because this will be a bumpy ride.
How to Use Silhouette Cameo – Unboxing and setting up the machine

This is fairly self-explanatory. Take it out of the box. Remove any and every sticker and packaging material. Look closely. Some are inside the machine.
When you start up the machine, and you hear weird nosiest then just shut it off and check it for any remaining packaging material.
Let’s assume everything is operational. Set up the connection, and you are almost done with this step. Before you even get started with the project, you need to update the software. This means both the machine side and design software as well.
You need to update the firmware version of Silhouette Cameo. Once that’s done, the Design Studio is next. You have probably received a CD in the package. So what do you do if you don’t have a CD-ROM? The same thing if you would have one.
Go on the official site and download the latest version. The CD contains an outdated version. So no biggie if you don’t have a CD-ROM.
Everything is working so far?
The best way for me is to learn is with the help of YouTube. Why should I reinvent the wheel when others have a well-functioning one?
No matter what’s your question somebody out there has solved it.
Launching Your First Project

The next step is to create your very first project. I highly recommend that you start with something simple. Put a name or some letters on the screen and cut it out from vinyl.
Even if you mess something up the damage is minor. Hopefully, you will test a lot and learn the ins and outs of the machine before you take on orders.
There are several tools in Design Studio. I would recommend you to start with simple letters and words and once you’ve mastered that move towards shapes and designs. If everything is perfect, you can create your very own designs and scan it then add it to the Silhouette Studio software.
We have covered two steps already there are few more to go.
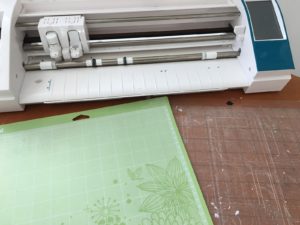
How do you set up your Silhouette Cameo for the cutting job?
First of all, pick your cutting mat and remove the protective sheet. It’s a good idea to keep this sheet, so the mat lasts the longest as possible. Once you have finished a job, put the sheet back, and it will protect the cutting mat from dust and debris.
Over time the mat will lose stickiness. I’ve created a helpful article a week or so dealing with that issue. There are two things to do with a mat that has lost stickiness. First of all, you need to clean it, and after 4-5 cleanings you need to apply the adhesive spray.
If you are interested in that, you can read my article right here.
We also have an article on How to Clean Silhouette Cameo 3 Machine to keep every aspect of your Cameo spick and span!
Solution for Mat Extra Stickiness
But we are far, far away from that issue. Right now, the problem is that the mat is too sticky. You see if the mat is too sticky, the cutting process will be a failure. The vinyl or the material you are using might stick way too much and tear your design into pieces. This is highly possible if you are working with an intricate design.
For this problem, there’s an easy solution. Either use a shirt or jeans and press it against the mat, so it loses a bit of its sticky strength.
After you are done with that procedure, you need to load the mat into the Cameo. We’re almost at the finish line.
Are you creating designs for T-shirts or decals? Then here’s a helpful tip, flip the text or design in the software (use the mirror option).
If everything is set up correctly, you can start the vinyl cutting process.
Power on And?
Load the vinyl, and there’s one more thing to add to the cutting machine to be operational. You have to select the right cutting tool for the job.
Silhouette Cameo has an auto blade. This means that you insert the blade into the machine, and it will automatically calculate the force needed to cut the material.
Here are the most significant issue users most machines have just one holster. The Cameo 3 has dual carriage ability. This means that you can do two tasks at the same time. You can draw and cut at the same time.
From this feature, many misunderstandings come about. Here’s the rule. The auto blade can only be inserted in the left holster as in the one that has a red circle on the top. Once you have placed the auto blade, make sure you press down until it clicks. There will be a little dot turning blue. Once that happened, you are all set and done.
If you have incorrectly placed the auto blade or any blade for that matter, the cutting process won’t be successful.
If you have chosen a different blade than the auto one, then you will have to set the cutting depth manually. Luckily there’s a guide that will help you get to set the right cutting depth.
Maybe you are using it for one material only that’s perfect because once you set it, you will be using it all the time.
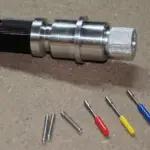
Helpful tip: over time the blades will get dull. The fastest way to wear them out is to use them on different materials. For example, if you are using it both to cut paper and vinyl, it’s better to have a separate blade for paper because that dulls faster.
Phew, I had to cover all this before we ever started the machine. Now it’s time. Fire it up and watch how it does the job.
After it has finished cutting unload the vinyl and cut out the part. The next step is removing the excess material, also known as weeding. Do this in a well-lit area with a professional weeding tool.
My Two-Life Rules
I have two rules when I work: Rule #1 create space without it. I lose time sorting and moving things left and right. Rule #2 use the right tool for the job. Again not having the right tool will slow me down considerably even it will get me to the brink of frustration.
Once you have done with the weeding, you are finished. All you need is to apply it on the desired surface.
Now since we’re at the beginning, it’s OK to start small and test. As you can see, there are a number of working pieces here. To accept and deliver orders, you need to learn a lot.
Since this is the learning stage, pick a throwaway t-shirt or fabric, and start experimenting. Even if it doesn’t come out on the first try don’t worry, it’s just training. Sooner or later you will become a pro and get handsomely paid for it.
This is the time to say goodbye. I will conclude my How to Use Silhouette Cameo guide shortly. If you’re interested in an in-depth Silhouette Cameo Review to check it out here.
Let’s do a bit of recap before I close this guide.
Step by Step Guide
First of all, start with the apprentice cap on. The more you learn, the better you will get. Try the simplest designs first. Once you have a few wins under your belt, it will be much easier to tackle harder, more complicated designs.
What we have covered in the article above is the proper way to unbox the Silhouette Cameo cutting machine. It’s important to remove every tape and packaging material if you want a functioning machine.
After that, I’ve mentioned that the firmware needs to be updated and the Design Studio has to be downloaded from the main site.
The next step is the hardest one learning to use Design Studio. There are numerous options, but if you want to get the first vinyl cutting done fast, pick some random letters or maybe a name and hit the cut button.
You need to load a not so sticky mat because smaller details might tear off. And after that, I’ve discussed how to load the blades into the machine. So far, so good. You can hit the cut button, and you will have your first design ready.
Once you’re done with that, you need to weed out the unwanted materials. It’s always a good idea to use it on throw away stuff while you’re learning. One of the most frequent question I got in my inbox was how to stencil with Silhouette studio software. For this I’ve created a nifty guide.
Closing Thoughts
That’s about it. If you think I’ve missed something or you want me to cover something different you can leave a comment below. Alternatively, you can send me an email as well.
Until then,
Happy Crafting!
Frequent questions from our readers (FAQ):
How do you use Silhouette Cameo for heat transfer?
You need to create your design in the Silhouette studio first. Then you cut it out. And apply the heat transfer tape.
How do I use text in silhouette cameo?
It’s quite easy. After you started up the Silhouette Design Studio just add a text element. Enter the desired text and choose the font that you want to use. If there’s no font to your liking check out the marketplace to see if you can find something that works for you.
Is silhouette easy to use?
Sadly it’s not as easy to learn as the Cricut. The truth is that there’s a steep learning curve to go through before you can use it.
How do I connect my silhouette cameo to my computer?
The Cameo is advertised that it supports Bluetooth connections. Well many crafters me included didn’t managed to setup the connection. So the only way and the safe way to connect to the Silhouette Cameo is through the USB cable.
What happened with the silhouette cameo 3?
The silhouette cameo 3 has been retired. Version 4 came out. If you have read my cameo 3 review you know there were many bugs with the silhouette machine. There are two major improvements since the cameo 3. The new Cameo has a good Bluetooth connection and has the feed roller built in. If you still want to get the silhouette cameo 3 you might get lucky at a silhouette america partner store if they haven’t sold it already.
Which is the best silhouette machine?
The best silhouette machine used to be the silhouette cameo 3 now it’s official that the best one is the silhouette cameo 4. Silhouette america also released the Silhouette Portrait 3 and Curio. If you’re looking for a portable silhouette machine then the Portrait is your best bet.
How can I get the silhouette studio software?
The silhouette studio software arrives with the machine on a CD. If you don’t have CD-rom then you can download silhouette studio software from the official silhouette america site.
How hard is it to learn silhouette studio?
There’s a learning curve with the silhouette studio compared to the Cricut. The main pro for the silhouette studio would be that you can do advanced stuff which is impossible with Cricut. Make sure you do the demo project first. This will boost your confidence. If you’re familiar with any design software it will be easier to learn silhouette studio.
How good is the silhouette cutting mat?
The silhouette cutting mat is quite good. It last a decent time. Just in case if it’s gets messed up or you want to restick it i have tutorial on how to clean the cutting mat. If you use your silhouette make sure you check the cut settings and adjust the blade depth so you don’t damage your cutting mat.
Can I use a sketch pen with my silhouette machine?
Yes you can use your silhouette with a sketch pen. When you’re buying a sketch pan make sure it’s compatible with silhouette. The rest can be done with silhouette studio.