Do you have a project that needs some welding or unwelding done but you’re not sure how to do it?
In this blog post, we’ll walk you through the process of how to unweld in Cricut Design Space.
This is an essential skill for anyone who wants to create their own designs.
Let’s get started!
What is Weld in Cricut Design Space?
The Weld tool allows you to attach two images or text together as if they were one piece.
For example, you can use Weld to create a collage of photos or to make a custom logo.
To use the Weld tool, simply select the images you want to combine and then click the Weld button in the bottom toolbar.
What Does The Weld Tool Do?
The app will automatically detect any overlapping edges and weld them together.
You can then adjust the position of each image within the design and even add additional elements, such as text or embellishments.
The weld tool can also be used to attach multiple pieces together, such as when you’re creating a multi-layered design.
Read our related article, Cricut Weld vs Attach. We compare these Cricut tools and their uses!
How to Unweld in Cricut Design Space
Technically, there is no “unweld” button in Cricut Design Space.
However, there is an “undo” button.
So if you weld something and want to unweld it, then be sure to click “undo” after welding the designs together.
When you’re happy with your design, simply send it to your Cricut machine to be cut.
Here’s a video showing how to weld and unweld in Cricut Design Space:
How to Weld Fonts in Design Space

It’s actually quite easy to weld fonts and text in Design Space.
You might think that the Cricut machine would cut the letter as a whole design, but that’s not actually how it works.
The machine will cut each letter separately so welding them together makes the letters one consecutive project and cut.
How To Weld Fonts
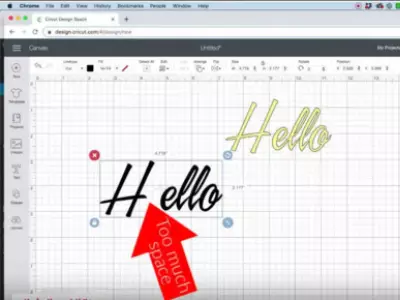
Welding fonts can be super easy and can be done in a few short steps.
- Type a word or phrase into Design Space.
- Arrange letter spacing so that letters are touching.
- Select all of the letters in the word or phrase and click “weld.”
You should then see that your project moves as one and will be cut as one!
Read More: How to Slice Text in Cricut Design Space. There are so many tools to use in Design Space, learning as many as possible can make your life easier!
Potential Problems With Welding
When it comes to using any type of tool or feature you can expect to come into some conflict from time to time.
Sometimes you might find that your letters or images did not weld together.
If this happens, zoom in and check to make sure every image or letter is overlapping.
The overlap is what the weld tool picks up and welds the pieces together at, so it’s necessary for them to overlap somewhere.
Conclusion
Welding your images or fonts together is a useful tool when it comes to creating crafts.
We hope that this article gave you some tips on how to weld and how to unweld in Design Space!
With a little practice, you should be able to weld your text and designs together without any problems. Thanks for reading!
Further Reading
- Cricut Alternatives – Which Is The Best Choice For You?
- Best Vinyl Cutting Machine Reviews
- Best Cricut Projects For Fun