If you’re looking for a detailed guide on how to cut vinyl with silhouette cameo, you’ve come to the right place.
In this blog post, we’ll discuss the different ways that you can cut vinyl using your silhouette machine.
We’ll also provide tips and tricks for getting the best results possible. So whether you’re a beginner or an experienced vinyl cutter, this blog post has something for everyone!
How to Cut Vinyl With Silhouette Cameo – The Basics
The Silhouette Cameo automatically detects which blade you place in the tool clamp, making setup a breeze.
Simply choose your vinyl, load it into the holder, and pop your blade in the housing.
You’ll know which blade to use by consulting the packaging for the material you’re using or your machine’s manual.
Silhouette Studio can also tell you which blade to use for your material.
Make sure your design is loaded in Studio, and confirm that the blade settings are correct, then press, “Go.” The Cameo will quickly cut your design.
If you want to use a previous generation blade with a Cameo 4, put it into one of the provided adapters (choose based on the color code) and place it in Tool Slot 1.
The Cameo will recognize the blade, thanks to the pre-programmed chip in the adapter, and adjust the settings for you.
We’ve compared the Silhouette Cameo vs Cricut Explore Air 2. See how they stack up in this guide!
2 Ways to Cut Vinyl With Silhouette Cameo

There are two main ways to cut vinyl with your Silhouette Cameo: a built-in cutter or a blade adapter.
We’ll discuss both methods in detail so that you can choose the best option for your project.
Use Cameo’s Built-In Cutter
If you’re using the built-in cutter, there are two things that you need to do before you can start cutting vinyl.
- First, make sure your blade is sharp. If it’s not, you can purchase a new blade from the Silhouette store or online.
A dull blade will give you ragged cuts and can even grab and pull the vinyl, ruining your cut design.
- Adjust your cutting depth. The cutting depth is the distance between the blade’s tip and the vinyl.
You can change the cutting depth by turning the dial on the side of the machine. Use the recommended cutting depth given on the package for the material you’re using.
After preparing your machine, you’re ready to start cutting!
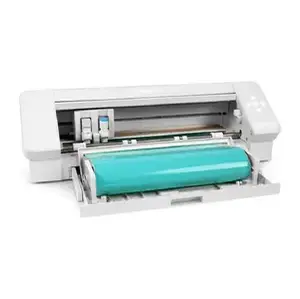
Place your vinyl on the mat or load the vinyl roll into your machine. Then, use the software to design your cuts.
Press “Go” and watch your Silhouette Cameo effortlessly cut your design right off of the roll!
Read our related article on How to Cut Felt With Silhouette Cameo! Cutting felt is a breeze with the Cameo. Here’s how to get started.
Use Cameo’s Blade Adapter
The only reason you might use a blade adapter is if you want to use a previous generation blade with a newer machine.
We love that these adapters come with the new Cameos!
The fantastic thing about the adapters is that as long as you use the right one for the right previous generation tool (they’re color-coded) the Cameo will detect which tool you’ve inserted and adjust itself.
They’re super easy to use.
- Select the right adapter for the blade you want to use
- Open the adapter by releasing the tabs on the side
- Snap the adapter over the top of the blade where it inserts into the machine clamp
- Pop the adapted blade into the Tool 1 slot
The Cameo will automatically detect which blade you’ve inserted, thanks to the detection chip in the adapter.
Load your design into the machine, load your vinyl, and press “Go.”
Are you still shopping for your perfect cutting machine? If so, check out this article where we run Cricut vs Silhouette head-to-head.
How to Cut Vinyl With Silhouette Cameo Step-by-Step

The Silhouette Cameo comes with its own design software called Studio.
The Silhouette company makes it easy for you to get any firmware updates or software downloads directly to your machine.
Step One: Gather Your Supplies
Before you can start learning how to cut vinyl with Silhouette Cameo, you must first gather all the necessary supplies.
- Vinyl
- Silhouette Cameo cutting machine
- Transfer Tape
- A Silhouette cutting mat if you want to use vinyl sheets. The pull-out cutting tray will work with vinyl sheets if you don’t need a full 12-inch cutting width.
If you do not have any of these items on hand, do not fret! Everything you will need can be easily sourced from the internet or your local craft store.
Step Two: Choose Your Design
Now you have all the necessary supplies, it’s time to choose a design. This can be anything from simple words or phrases to intricate and detailed graphics.
You may want to use one of the free designs that came with your Studio software for a first project because you know it will turn out great and give you an easy first run on your machine.
After deciding on a design, open up the Silhouette Studio software and begin creating your masterpiece!
If you need help with this step, check out the tutorials section below.
Step Three: Cut Your Vinyl
After you have completed your design, it’s time to cut your vinyl.
- Load your vinyl into the machine
- For sheets, you can use a cutting mat or the pull-out cutting tray.
- For rolls, you can load them directly and then use the built-in cross cutter to release unused vinyl once the cut is complete.
The Silhouette Cameo will auto-detect the blade you’ve inserted into the clamp and adjust settings accordingly so you can get perfect cuts every time.
Once your vinyl is cut you may want to simply remove your cutouts and adhere them to your project, or you can weed away the negative space and use transfer tape to move your design with precision.
Step Four: Apply Your Vinyl
Now your vinyl has been cut, it is time to apply it to your desired surface.
For this step, you will need to use transfer tape.
- First, peel away the backing from the vinyl and then place the transfer tape on the top.
- Next, use a scraper tool or your fingers to press the vinyl onto the transfer tape firmly.
- Finally, peel away the transfer paper, being careful not to remove any of the vinyl with it.
You should now have a beautiful vinyl decal on your chosen surface if everything goes according to plan!
Need some inspiration for projects to tackle with your Silhouette Cameo?
Check out this video and you’ll be struggling to choose just one!
Tips & Tricks For Cutting Vinyl With Silhouette Cameo
If you want to make sure that your vinyl cutting project is a success, then here are some tips & tricks that will help you get the best results possible every time.
- Use the correct blade type on your Silhouette Cameo.
The blade that you use will have a significant impact on the quality of the cut, and it can also affect how easy or difficult it is to cut through the vinyl.
Your vinyl package should say what blade to use or consult the manual for your machine model.
- Use the correct settings on your Silhouette Cameo.
The settings that you use will determine the speed and depth of the cut, so it’s essential to take some time to look up settings in the manual and make sure it’s programmed correctly.
- Test cuts before beginning your project to make sure it’ll turn out the way you want.
This will help you get a feel for how the machine works, and it will also allow you to troubleshoot any problems you may encounter.
If you follow these tips, we are confident that you will be able to cut vinyl with your Silhouette Cameo successfully.
This machine is designed to be as intuitive as can be – easy for beginners yet capable for experienced crafters.