Do you want to learn how to make a border in Cricut Design Space? If so, you’ve come to the right place!
In this blog post, we’ll show you how to create a beautiful border using this software.
How to Create an Image Border in Design Space
If you’re looking to create an image border in Design Space then you’re in the right place.
Here are the steps you’ll need to take in order to create an image border.
What you’ll need:
- Cricut Machine
- Cricut Design Space installed
- An image you’d like to add a border around
Now that you know what you need, here’s how to get started.
Upload Image
Upload your image onto the canvas.
This can be done either by dragging and dropping or by clicking on the “upload” button.
Edit the Image to your liking
Edit the image however you’d like before adding in the border.
This could mean changing dimensions, and colors, or putting a filter.
Add The Border
You’ll need to start by duplicating the image.
You’ll then want to remove any layers from that duplicate that don’t include the bottom layer.
This is because you just want the bottom layer to create the border.
Once you have the bottom layer done, you’ll make it black (or whatever color you want the border).
Layer Images
Layer your original image on top of the duplicate.
This will make your image look as though it has a border around it, but it’s essentially a bottom layer poking out beneath.
When you’re happy with your border design, save it.
How to Add a Text Border Cricut Design Space

Text Borders are a great way to add some extra flair and personality to your Cricut projects.
Fortunately, they’re also quite easy to create in Cricut Design Space.
Here’s how to create your text border:
Start Project
First, open up a new project and type out the text that you want to use for your border.
Then, select the Text tool and click on the Text Box button in the top toolbar.
This will allow you to choose the fonts and type out your word or phrase.
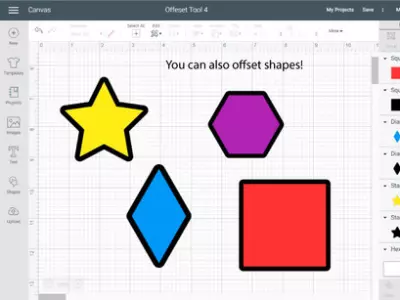
Putting A Border
Click on your text and ensure that it’s selected.
At the top, you should see a button labeled “Offset.” Click it.
You can then adjust the thickness of your offset as well as some other edits.
Make sure to leave “weld offsets” ON. Then click “Apply” and you’re done!
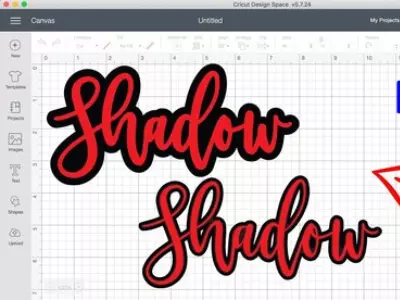
Final Touches
Once you’ve completed the above steps you should see your text with its border on your workspace.
This is when you’ll be able to adjust the color of the border rising the toggles above.
Once you’re happy with the design you can finish the Cricut project however you’d like.
Read More: Cricut Ideas to Sell. We share our favorite Cricut projects that could make you money on the side!
How to use Shapes to Make Borders in Design Space
If you’re looking to add a touch of pizzazz to your next Cricut project, why not try using shapes to create borders?
It’s easy to do in Design Space, and the results can really make your design pop.
Here are the steps to making a border using shapes:
Choose A Shape
Choose a shape that you’d like the border to be.
Then duplicate the shape and make it a different color and smaller size than your original shape.
Shape Placement
Place the smaller second shape on top of the original larger shape where you’d like the border to be.
You’ll notice that it gives a bordered look on the outside; use this as your guide.
Slice
Once your shapes are layered on top of each other, you can hit “Slice” and it will cut out the inner shape.
Then you can delete the inside shapes and you’re left with a border.
Final Touches
You can go back and adjust the shapes to make your border thinner or thicker based on preference.
Use this border for photos, words, t-shirts, Cricut car decals, and so much more!
Here’s a short video showing how to make different borders in Cricut Design Space:
How to Make Custom Border Designs in Design Space
Custom Borders are a great way to personalize your projects in Design Space.
You can use Custom Borders to frame images, create patterns, or add detail to text.
To create a custom border in Design space you’ll want to follow one of the methods above to create the border.
Whether that’s using shapes, text, or images.
When making your border you can add images from the Design studio to make your borders patterned or personalized.
Conclusion
Hope this blog post has helped you understand how to make borders in Cricut Design Space!
With a little practice, you’ll be able to add beautiful borders and shadows to all your Cricut projects.
Read More:
- Cricut Alternatives – Which is the Best Choice for You?
- Best Vinyl Cutting Machine Reviews