Cricut cutting mats are an essential part of your Cricut cutting machine. They help you get your project material lined up so the machine cuts precisely.
Cricut mats also grip your project materials firmly so they don’t slide around during cutting. They are key to getting perfect results from your Cricut machine.
Learn how to load Cricut mats properly so you can get perfect results from your cutter every time!
We’ll also explain the differences between the mats so you know which one to pick.
How To Load Cricut Mats (All Machines)

There are various Cricut machines, but the mats load the same way.
- Load your material onto the mat, carefully lining it up on the grid.
- Hold the bottom center of the mat and line it up with the machine guides.
- Lift the bottom of the mat gently so the leading edge touches the rollers and dips slightly under.
- Hit the “Load Mat” button. From this position, the machine rollers will grab and feed the mat.
The machine will take a few seconds to orient the mat before beginning to cut.
What Are the Types of Cricut Mats?
A Cricut mat is a cutting pad, similar to a vinyl cutting mat, specifically designed for the Cricut machine.
They are coated with a sticky reusable adhesive surface that grips materials for precise cutting.
The mats generally fit all types of Cricut cutting machines, with the exception being the Cricut Joy.
This machine is made to cut vinyl and other Smart Materials straight off the roll.
The Cricut Maker 3 is also designed to work with Smart Materials so you can cut huge banners or a full roll of confetti without ever reloading.
The Cricut Joy workspace is narrower, so the mats that fit the Cricut Joy are also narrower.
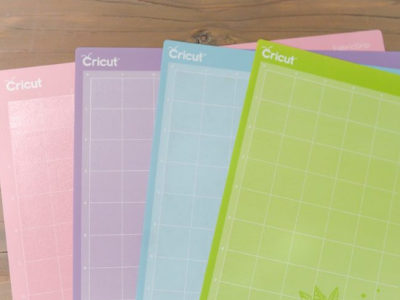
There are several levels of tack available on Cricut cutting mats. Each tack level is designed to hold different types of materials securely.
- Green Standard Grip Mat – The mat most often used because it holds paper, cardstock, vinyl, iron-on transfer paper, cotton fabric, and similar weight materials.
- Blue Light Grip Mat – Good for lighter-weight materials like vellum, regular-weight printer paper, lightweight fabrics, and thin cardstock. It’s good for any material that might tear if you try to remove it from a standard grip mat.
- Purple Strong Grip Mat – Ideal for heavier materials that tend to slip around during cutting. Use it for cork sheets, wood sheets, glitter cardstock, stiff fabric, and chipboard.
- Pink Fabric Mat – The best mat for cutting any fabrics. It has a light adhesive so your fabric won’t fray or become stretched or deformed when you remove it after cutting.
- Blue Card Mat – This innovative mat protects the back of your folded card while cutting, debossing, or drawing on the front or inside! The Cricut Joy can do 1 card at a time, while the large card mats can fit 4!
Regardless of the type of mat you use, you need to know how to use it right so your materials don’t slide around and the machine lines up to cut it correctly.
Read More: Cricut Joy Projects. We share our favorite Cricut projects for you to get started on (great for beginners!)
How To Load Cricut Mats Step-by-Step
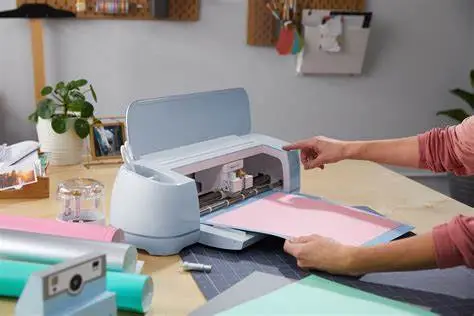
Most people are right-handed and tend to load the mat by holding the left side. You’re more likely to get it off-center doing it this way.
You also may find that the rollers don’t want to grip it and pull it in for cutting. Instead, follow these steps to get a more reliable feed the first time you try.
- Make sure there are Cricut machines blades or another tool in the machine before attempting to load the mat. Many models won’t accept a mat if there isn’t a tool loaded.
- Always place your media on the cutting mat before loading. Many machines won’t load if there isn’t something to cut on the mat.
- Line your material up on the grid lines precisely.
- Press the material down to get adhesion to the mat. Use a brayer for Cricut if necessary to get a good stick.
- Hold the mat at the center of the bottom and move the mat toward the rollers.
- Line the mat up with the guides then move it until it touches the rollers evenly.
- Slightly lift the mat, while keeping it centered so that the leading edge is headed under the rollers.
- Hit the “Load Mat” button and let the rollers pull the mat into position.
It really is as easy as can be. If the machine detects that the mat is slightly off-center it will attempt to correct this before cutting.
If the mat is crooked enough that the machine can’t fix it, use the “Unload Mat” button to eject the mat, recenter, and try it again.
See how this crafter loads her mat and makes sure it’s straight in the video below.
(Please don’t let your mat get as dirty as the one in this video. It’s hard on your cutting machine.)
Read our related article on How to Clean a Cricut Mat for proper care instructions and a step-by-step guide!
FAQs
Q. Does the Mat Fit My Cutting Machine?
A. Measure your machine bed opening first before looking for a mat replacement. The most common-sized mats are 12×12 for full-sized machines.
When in doubt, find your machine on cricut.com and look at the specs to see which sizes of mat you can use in your machine.
Make sure you have the correct mat size chosen in your program before loading.
That could be another cause for it to not feed if it’s expecting a different size than the one you’re feeding to the rollers.
Q. What Is the Paper Guide Set Used For?
A. These guides help you cut straight lines and protect objects from getting damaged by your cutter blades from spreading too much through pressure or misalignment of the material.
Q: Why Won’t My Rollers Feed the Mat?
A: If you find that your rollers are being especially stubborn about feeding the mat they may be broken.
Here are some steps you can try to see if you can clear out any programming problems before calling customer service.
- Clean the rollers carefully with some canned air to remove any dust or debris that may be keeping them from rolling. If you find something sticky, remove it with a little isopropyl alcohol on a cotton swab.
- Double-check that you have a tool loaded into the machine and also make sure you have some sort of media on the cutting mat. Some machines won’t load your mat if you’re missing a cutting tool or haven’t loaded media on the mat.
- Press the “Unload Mat” button to clear the machine in case it thinks there is already a mat loaded. Then try placing your mat and hitting the “Load Mat” button again. Sometimes this is enough to reset the program and get it to take the mat.
- Try resetting the machine by clearing all commands and then hitting “Load Mat” again.
- Try placing a different tool in the cartridge. Possibly the machine isn’t recognizing the blade you selected.
If none of these solutions work then it’s time to contact Cricut Customer Service. There may be something wrong with your rollers or sensors requiring a fix.
Wrapping Up
Cricut mats are essential for using a Cricut cutting machine, and they nearly always load perfectly.
If you’re tired of loading mats and cleaning them to keep them working, check into the Cricut Smart Materials and the machines that use them. It’s a game changer!